How to Connect Claude to Your Obsidian Vault and Banish Broken Wikilinks
Introduction
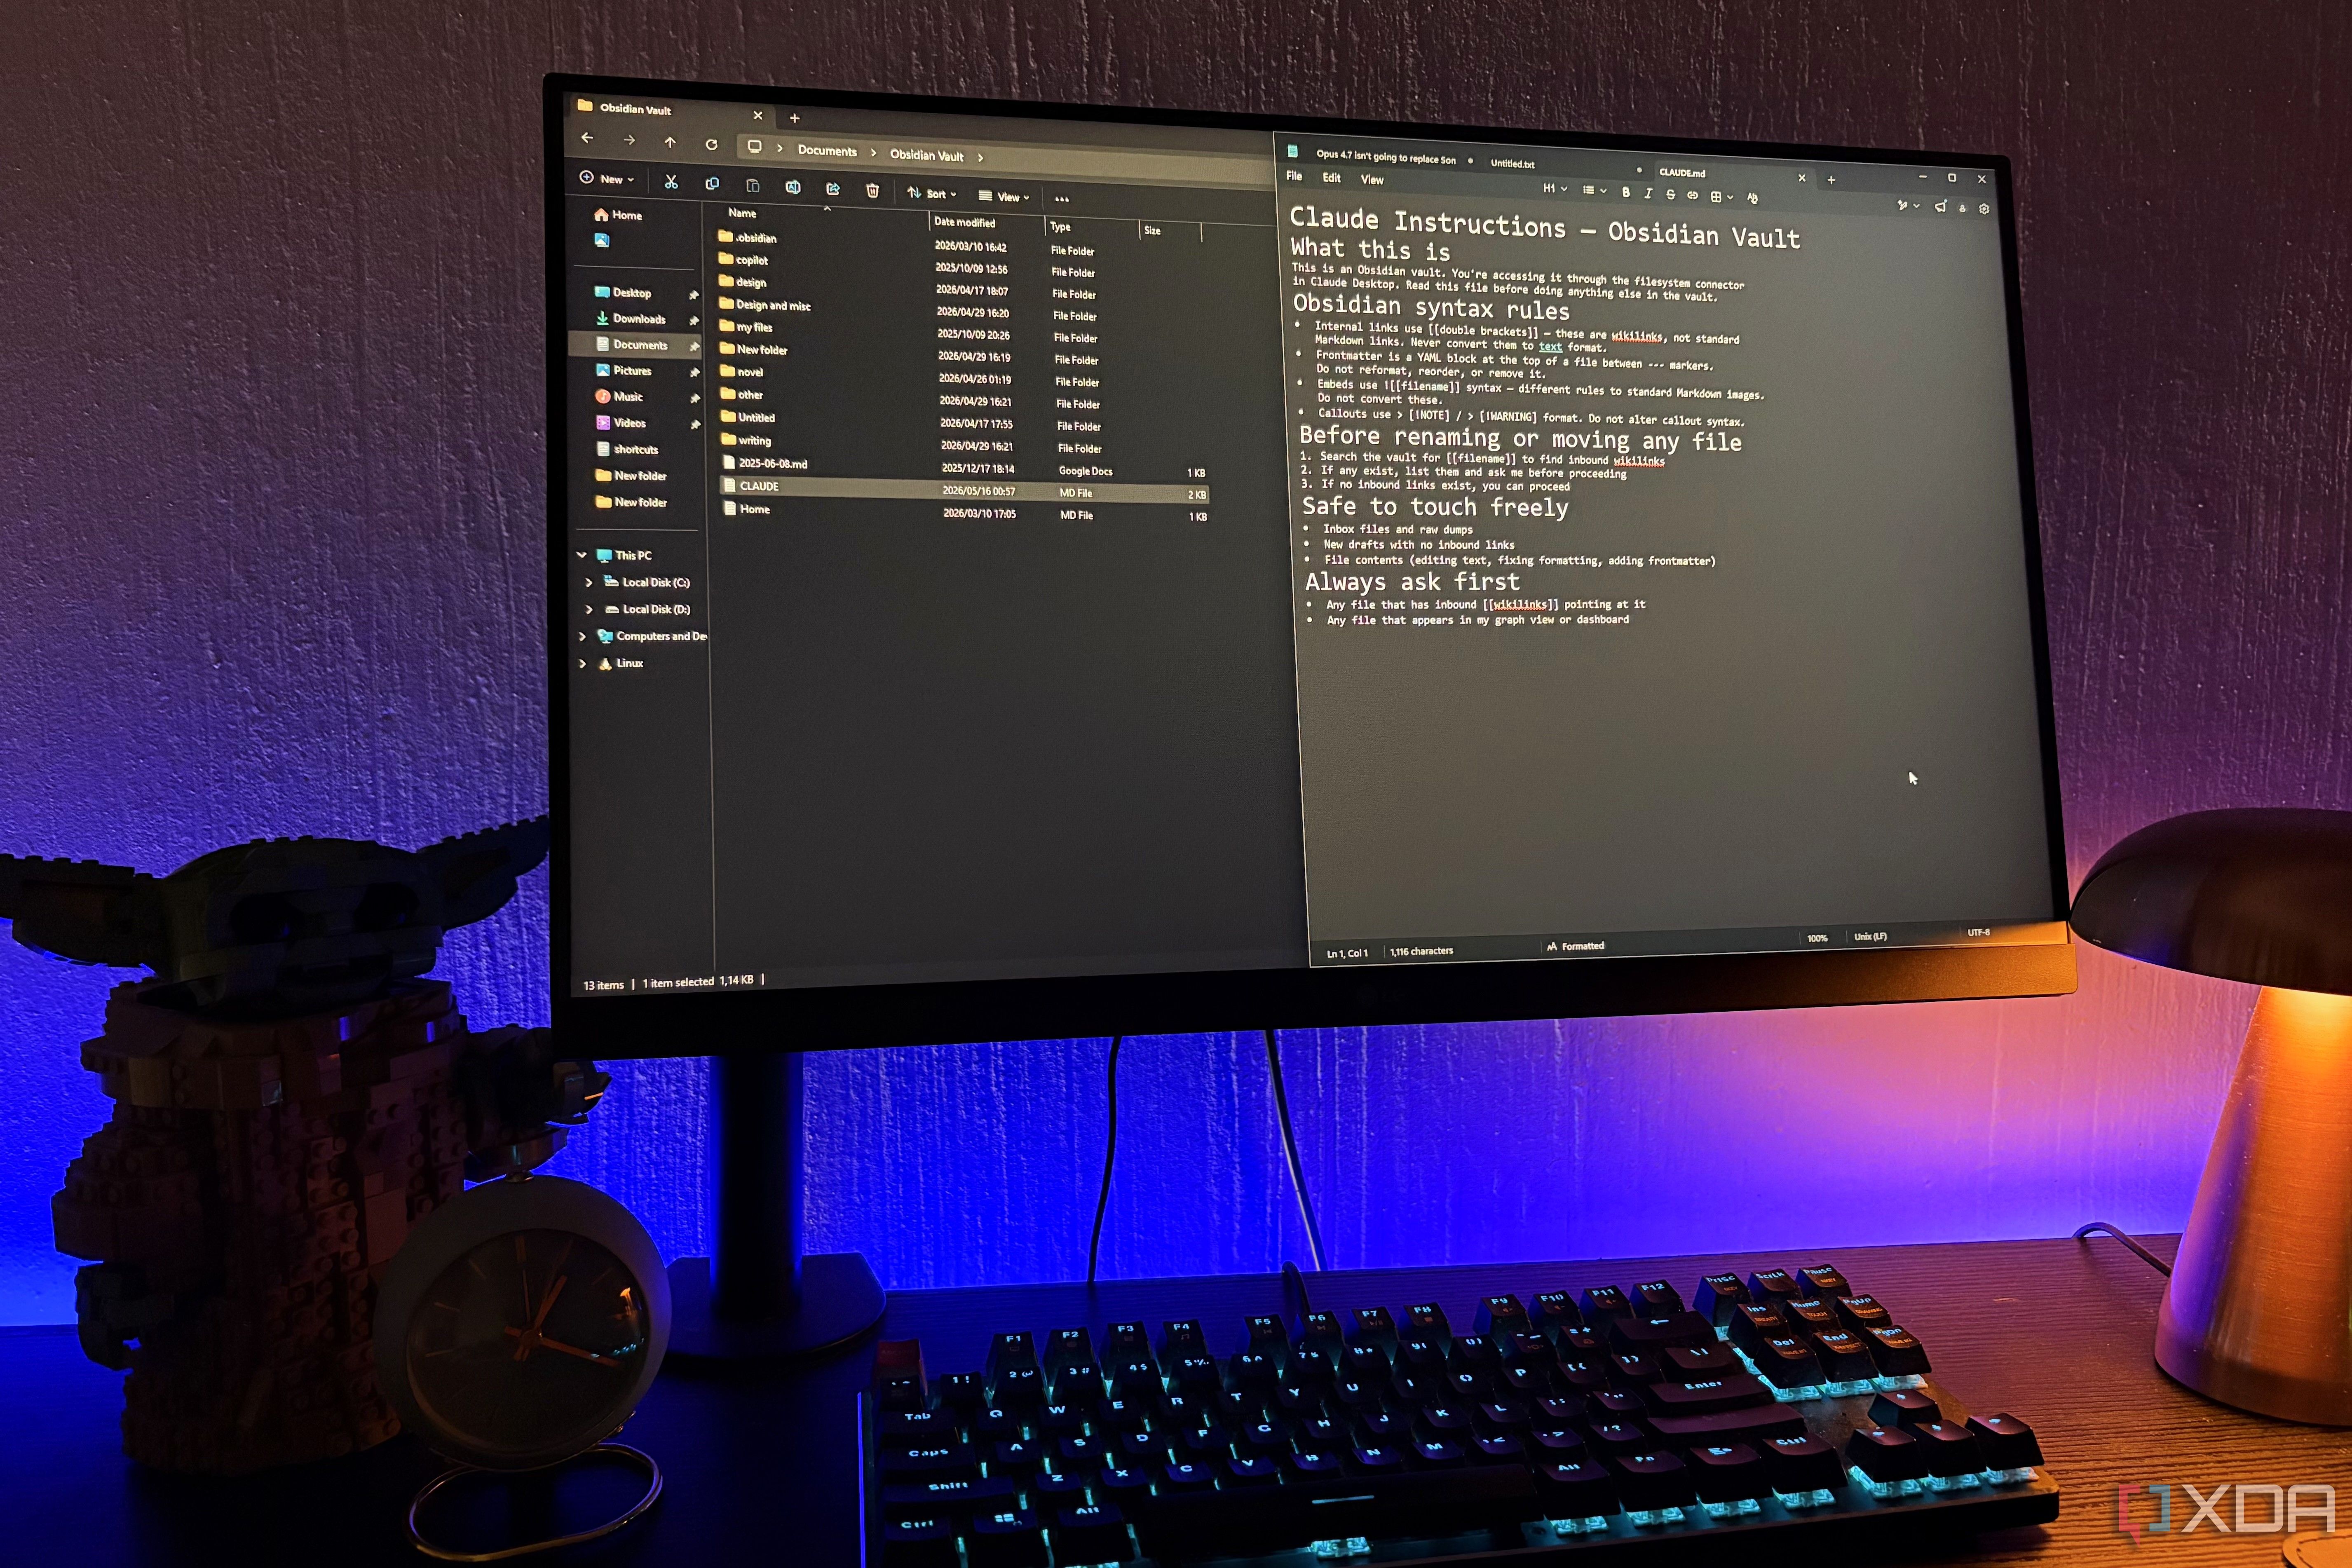
If you're a power user of both Claude and Obsidian, you've likely felt the pain of broken wikilinks. Every time you reorganize a folder or rename a note, those [[links]] turn into dead ends. But there's a surprisingly simple fix: connect Claude directly to your Obsidian vault using the filesystem connector. This lets Claude browse, edit, and reorganize your notes within the chat interface — and because it sees the actual file structure, wikilinks stay intact. No MCP (Model Context Protocol) setup required. In this step-by-step guide, I'll show you how to set this up in minutes and put an end to broken links for good.
What You Need
- An active Claude account (Claude Pro or Team, as the filesystem connector is available in those tiers)
- An Obsidian vault — a local folder containing your notes (folder sync services like Dropbox or iCloud work fine too)
- The exact folder path to your Obsidian vault on your computer (we'll find it in Step 1)
- Internet connection (Claude is cloud-based)
- Basic familiarity with your operating system's file explorer (Finder on Mac, File Explorer on Windows, etc.)
Step-by-Step Instructions
Step 1: Locate Your Obsidian Vault Folder Path
First, you need to know exactly where your vault lives on your computer. Obsidian stores your notes as plain markdown files in a standard folder. To find it:
- Open Obsidian.
- In the left sidebar, click the vault name (usually at the top) or go to Settings → About → Your vault folder.
- Obsidian will show the full path (e.g.,
/Users/yourname/Documents/MyVaulton Mac, orC:\Users\yourname\Documents\MyVaulton Windows). Copy that path.
If you can't find it in settings, right-click any note in Obsidian and select Open in File Explorer (or Show in Finder on Mac). The folder that opens is your vault root.
Step 2: Open Claude and Access the Filesystem Connector
Now, head over to Claude (via the web app or desktop app). The filesystem connector is part of Claude's integrations. Here's how to reach it:
- Log in to your Claude account.
- Start a new conversation or open an existing one.
- Look for the “Add tool” or “Connections” icon — it's often a plug or puzzle piece icon near the input box.
- Click it and select Filesystem from the list of available connectors. (If you don't see it, make sure you're on a plan that includes the filesystem tool, like Claude Pro or Team.)
Claude will ask for permission to access a local folder. This is where you'll grant access to your vault.
Step 3: Grant Access to Your Vault Folder
Once you've selected the filesystem connector, Claude will prompt you to provide the folder path you copied in Step 1. Paste it in and confirm. Important: This action gives Claude read and write access to everything inside that folder — so double-check that you're pointing to the correct vault.
If you're using the desktop version, Claude may also ask your operating system for permissions. On Mac, you might see a popup asking to allow Claude to access a folder. Click Allow or navigate to the folder and click Open. On Windows, you may get a similar prompt from File Access settings.
Once granted, you'll see a confirmation message: “Claude now has access to your vault.”
Step 4: Test the Connection
Let's make sure everything works. In the chat, type a simple command like:
“List all folders in my Obsidian vault.”
Claude should respond with the contents of your vault folder. If you see the familiar folder structure, you're connected. Next, test a wikilink:
- Ask Claude to open a note that contains a wikilink — e.g., “Open the note called Daily Notes and show me its wikilinks.”
- Claude will read the file and display its contents. Look for any
[[broken]]links that appear red or underlined. Previously, these links would have been broken if the target note was moved or renamed. Now, because Claude sees the real file system, it can resolve them.
If a link is still broken, don't worry — that's because the target file might indeed be missing. But moving forward, wikilinks will keep working as long as the files exist at the referenced paths.
Step 5: Reorganize and Let Claude Fix Links Automatically
The real magic happens when you move or rename files. With the filesystem connection active, ask Claude to do your reorganization:
- “Move the note 'Project Ideas' into the folder 'Work'.”
- “Rename 'Old Budget' to 'Budget 2025'.”
After performing the move, Claude can update any wikilinks that pointed to the old location. Just ask: “Update all wikilinks in my vault that reference the old file path.” Or if you prefer a global update: “Scan my vault for broken wikilinks and fix them.”
Claude will literally edit the markdown files, changing [[Old Budget]] to [[Budget 2025]] or adjusting relative paths. And because it's operating on the actual files, the changes persist in Obsidian.
Step 6: (Optional) Automate With a Routine
If you find yourself reorganizing daily, you can create a recurring prompt: “Each morning, check my vault for any broken wikilinks and report them to me. Fix any you can automatically.” Claude will remember this request if you save it as a project instruction or use a custom Gist. This makes the process almost hands-off.
Tips & Best Practices
- Keep your vault path consistent. If you ever move the vault folder, update the filesystem connector path in Claude immediately — otherwise wikilinks may break again.
- Back up your vault before major reorganizations. While Claude is careful, it's always wise to have a backup (Obsidian's built-in version history or a Git repo).
- Use relative paths consistently. When creating new notes, always use wikilinks with the filename only (e.g.,
[[Note Name]]). Avoid absolute paths like[[/Projects/Note Name]]if you plan to move files. - Test one file move first. Before asking Claude to reorganize your entire vault, move a single test note and verify the wikilink updates work as expected.
- Combine with Obsidian plugins for bonus power. Tools like the "Wikilinks to Markdown" plugin can convert all links before handing them to Claude — but with the filesystem connector, you often don't need to.
- Monitor Claude's usage. Heavy file operations can eat into your hourly message limit. Use separate chats for vault maintenance to keep your main workflow clean.
That's it! With Claude connected to your Obsidian vault via the filesystem connector, broken wikilinks are a thing of the past. You can now reorganize, rename, and restructure your knowledge base with confidence, knowing Claude will keep every link pointing exactly where it should.
Related Articles
- How to Uncover the Hidden Wiper Flaw in VECT Ransomware
- Leaked Database Exposes Inner Workings of The Gentlemen Ransomware Group
- Bohmian Mechanics Test Could Settle Quantum Reality Debate: Physicists Propose Experiment
- 10 Key Insights About Planet Labs' Revolutionary Satellite Subscription Service
- The Chernobyl Exclusion Zone Fire: A Drone Crash Ignites a Growing Blaze
- Artemis II Moon Mission: Thousands of Photos Released – Highlights and Insights
- How to Select the Best Weather Model for Predicting Extreme Events: A Step-by-Step Comparison
- How Lightning Really Forms: A Guided Tour of the Latest Discoveries